
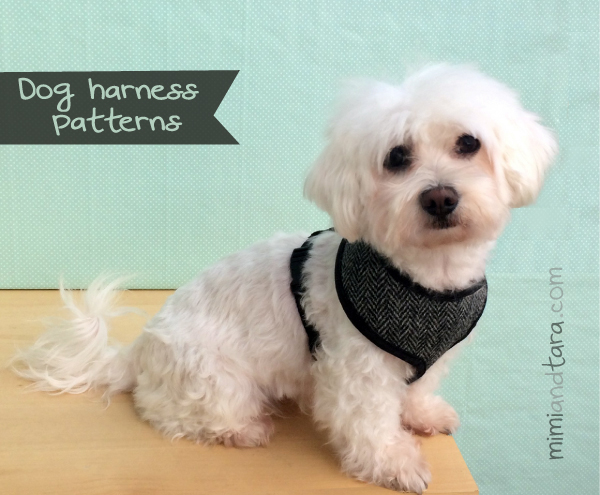
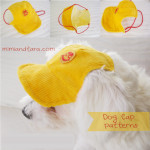
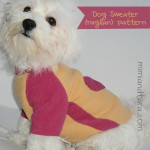
Dog bat wings hat patterns
Hi girls!! We are here again! Tara and I like Halloween and we never miss this party!
Hi girls!! Ready to Halloween?!!
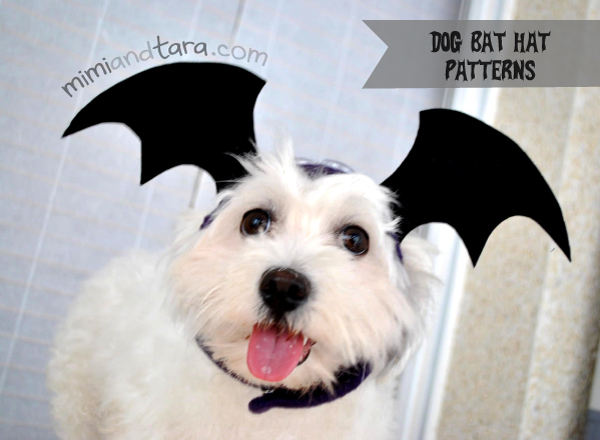
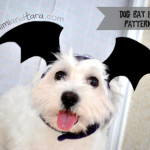
Today I want to teach you how to make this cute bat wings hat for your dog, your cat or for your little pet.
You can see below some photos of Tara with her new dog bat hat. At first she was a little uncomfortable with these ears so black!!

Look Mum, now I have big and black ears!!

…but I like it!! look how I’m posing!!

I look at one side…

…and now I’m sticking out tongue!

…and the mugshot jeje!!
At first I thought to make the hat all in black color, but I found more funny to make it in two different colors, wings with black felt and the hat with lilac fleece. Don’t you think it looks better like this?
To attach the hat I used a snap, but you can use a button or velcro.
When I went to the shop to buy the black felt I saw a little bag with wiggly eyes for crafts, so I didn’t hesitate to buy it to paste at the top of the hat. So that the bat can see better at night!!! If you don’t have plastic eyes you can get the same effect using black and white felt.
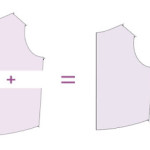
The patterns are three: the back piece, the front piece and the bat wings. You can see a preview of the patterns below.

You have to cut the back piece, with the fabric folded as indicated in the pattern to get it twice the size. This piece goes without lining.
You have to cut the front piece with the fabric folded, as indicated in the pattern to get it twice the long. Also you need to cut two opposite pieces of this pattern, because one of them will be the lining.

You have to cut two opposite pieces of the wings pattern, but if you are using felt you can cut two identical pieces and turn one of them when you go to sew because the felt fabric doesn’t have right or wrong sides.

HOW TO MAKE IT EASIER: This hat is made with fleece and this kind of fabric doesn’t fray. So if you prefer you can make this hat without sewing hems or lining, in that case you only need to cut one front piece not two.
SEWING THE HAT STEP BY STEP:
- Cut the patterns: 1 piece of “back” pattern and 2 opposite pieces of “front” pattern.

- Place the 2 “front” pieces with right sides together and sew one to each other all along the pink line, but don’t sew by the green line, this part should be opened so that you can turn it inside out. Then turn the piece inside out.

- Sew a hem of the “back” piece al along the pink line as you can see at the picture above.
Now you can see some pictures about how to assemble all the parts.

- Pin the center point and pin all the pieces together like the picture above.
- Sew all the pieces.

- Finally sew a snap, velcro or button at the end of the stripes to attach the hat.
- (Optional) You can paste two plastic wiggly eyes at hat’s top, better if they are big and closer to make it more cute.
… and ready!!

Wof!! What a day!!!
This hat pattern come in three different sizes: XS-S (little dogs, cats and bunnys), M-L(medium dogs) this is Tara’s size and XL-XXL(big dogs).
EXCLUSIVE DESIGN
Like all the patterns of this blog, this design is also made by me. But note that some dogs have bigger heads and other have a smaller heads, every breed is diferent, then it is possible in some cases you need to adapt a little the patterns for your dog.
I think it is very important that our pets feel comfy so I wanted to make this design with holes on the hat for the ears, because some breeds have the ears straight up, and it is not good for them to go with the ears covered.
Hope you like it!!
DOWNLOAD FREE PATTERNS in 3 different sizes below:
Important: please read this before printing the patterns:
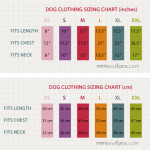
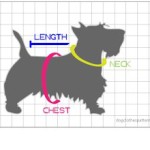
How to measure your dog for clothing
Dog clothing sizing chart
Tips for printing patterns
Happy Halloween!!!


1 Comment
exellent!! haha! i love this blog 😀